

Are you looking to install shower plumbing in your bathroom but don’t know where to start? If so, this article is for you.
Showers have become a crucial part of our homes. When installed and maintained correctly, a shower can serve you well for many years. But like any other plumbing fixture, getting your shower up and running can be a tough ask. There are many things that could go wrong – leaking pipework, weak water pressure, or even a faulty mixing valve that results in water that’s either scorching hot or too cold.
Simply put, installing shower plumbing correctly requires a lot of patience. If you don’t have any plumbing experience, you’ll have to work with tools you’ve never used before.
But we’re here to help you do the job right.
Need Help a Professional Plumber?
Need help with shower rough-in or replacing your fixture? Contact us today for prompt service.
Installation Basics
The modern shower has two water supply lines: a hot water pipe and cold water pipe. The two supply lines deliver water to a central mixing valve under pressure. After that, the unified water stream goes up the shower arm to the shower head where it emerges.
After a bath, the wastewater flows out through a drain pipe into the property’s general drain network.
A shower system can be broken down into three different parts: the shower faucet, shower head, and drainage. We’re going to outline the installation process along these lines to ensure that it’s as easy to follow as possible.
Items that you’ll need are:
Tools You Will Need
- Screwdriver
- Wrench
- Pipe cutter
- Screws
- Measuring tape
- Level
- Pencil
- Adjustable wrench
- Allen key
- Hammer
- Crimping tool
- Electric screwdriver
- Hole saw
Materials
- A faucet
- A shower head
- Crop-ear elbow
- Four threaded pipe adapters
- Silicon sealant.
- PEX shower tubing
- Caulking gun
- Sealant tape
Installing the Faucet
1. Shut Off Source of Water to Your Bathroom
Before work begins in earnest, you should turn off the water supply to your bathroom. For convenience, cut off the supply line into your bathroom and leave the main water valve open, just in case someone has some chores to do.
2. Mark Off The Spot The Faucet Will Be Installed
After that, you should work out the height of the faucet. The faucet also houses the handle, so it’s important to get the height right, especially if you share the shower with your kids. Ideally, the faucet should be 45 – 48 inches from the floor. Use a pencil to mark the right spot.
3. Mark Off The Spot The Faucet Will Be Installed
After that, use an electric screwdriver to insert a horizontal stud between the two vertical studs that already exist in your bathroom wall.
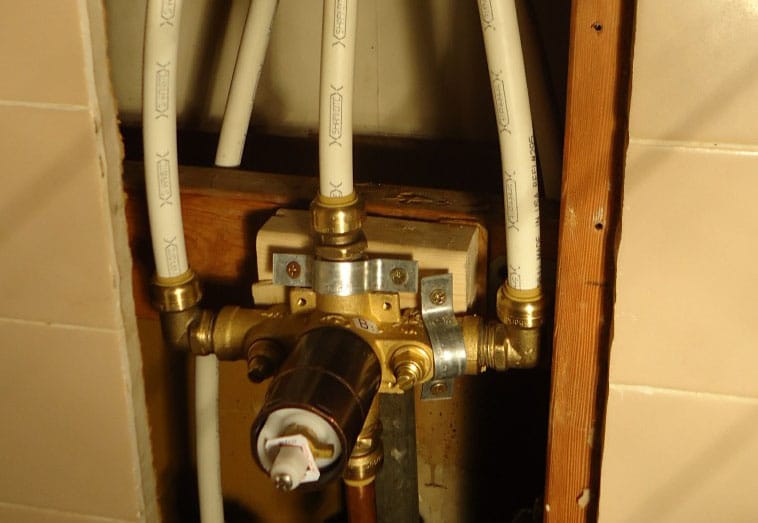
4. Install the Mixing Valve
Next comes the delicate part: installing the mixing valve. Position the valve at the center of the horizontal stud and then screw it into the stud. Before doing so, be sure to check the level. You don’t want to end up with one of the supply pipes fixed at a higher angle than the other.
You’ll then need to insert the pipe adapters on all four ends of the mixing valve. To avoid leakage, it’s always good to wrap sealant tape around the end of the pipe adapters. Next, connect the supply pipes to the mixing valve.
5. Connect the Vertical Column to the Mixing Valve
After you’ve done all that, you’ll now need to connect the vertical column that will attach the mixing valve to the shower arm.
Although some mixing valves are only designed for shower heads, most of them have room for a shower spout that connects to the lower exit. If your mixing valve has space for the spout, you may connect it through the lower adapter and then wrap the sealant tape around the connection point.
6. Install the Handle
At this point, you should now install the handle. But first, remove any covering on the valve and replace it with the decorative disc. Now screw the valve into the wall. To ensure that the screwing is as smooth as possible, make sure that the holes in the valve are positioned exactly under the holes in the plate. But that’s not the end. Next, use the Allen key to install the handle. In the process, ensure that the lever points downwards when the water is turned off.
Installing the Shower Head
Installing the shower head is easier than installing the faucet.
To begin, use the electric screwdriver to install a cross-stud at shower-head height. This is where you’ll insert the drop-ear elbow.
Then, screw the shower arm in to the drop-ear elbow. Just like the faucet, the shower arm should be airtight. To achieve this, wrap the sealant tape around the shower arm before screwing it in. Next, connect the shower arm to the shower head. Since you may need to remove the shower head occasionally for thorough cleaning, it’s best if you don’t over-tighten. Most people prefer just a quarter of a turn.
Ideally, the shower head should be 72 – 78 inches from the floor.
Installing the Shower Drain
You’ll need to connect the shower drain to the drain pipes with nuts. Although this stage is quite straightforward, you’ll probably need an extra pair of hands to align the shower drain over the drain pipe.
To avoid leakage, your shower drain and the drain pipes should be of the same size. For example, a 2-inch drain goes with a 2-inch pipe. In fact, most people prefer a 2-inch pipe over the 1 2/2-inch pipe to ensure that the water drains fast and therefore minimizes the risk of flooding in your bathroom.
When installing the drain, you’ll also have to cut through the ceiling to gain access to the drain pipes. It’s also important to ensure that the drain pipe has a sufficient slope. Otherwise, wastewater will end up getting stuck in the pipe and you may have to re-install the drain.
Any gaping holes left behind should be covered with silicon sealant. The sealant can easily be applied using a caulking gun.
For further reading on shower plumbing installation click here.
Tip
Every experienced plumber will tell you that no installation fixture is complete without testing. To do this, you need to turn the water back on and let it run for about a minute. During this time, you should watch out for leaks. Applying the sealant tape or tightening the screws should resolve any issues.
Insert conclusion section as per the second article
Why Should You Choose MT Drains & Plumbing
MT Drains & Plumbing has been in the plumbing industry for over 20 years and brings a wealth of experience to all kinds of plumbing work. All our plumbers are known for precision and unmatched professionalism. If you need shower plumbing installed quickly and efficiently, contact us right away.